Friday, June 6, 2014

Restoring a Dead Vintage Singer Sewing Machine

Since a lot of people have emailed me asking to elaborate on what to do to clean and restore old sewing machines, I did some research and found a series of 8 videos on You Tube.

If you are just starting out with a vintage machine the following videos by Duncan Hill are worth watching. He does a thorough job of explaining how to dismantle the machine, clean the machine and of course put it back together.  

Here is the link:

If the above link does not work do a search on you tube for the title above.

Remember there are 8 parts. I saved them to my watch list, that way I can quickly find them if needed.

Even though these videos are specific to the hand crank singer, most of the old singer non-motorized
machines are very similar.

I hope this helps everyone with restoring or just cleaning the vintage singer machines.  

Let me know how you do.

Monday, June 2, 2014

What To Do With Small Scraps?

What do you do with small scraps, or "crumbs" as some people call them?

I am a hoarder, as my husband calls me, of fabric. I love and breathe fabric! I can not look at a piece without touching it or wanting to buy it, if available and affordable. Way back when I started sewing my own clothes, I started thinking what should I do with the left over fabric?

Here comes my two aunts to the rescue. They made a lot of their own clothes if not all of them. One aunt suggested I save my pieces and coordinate them in color so I could piece a blouse, jacket or pants. After she said this, she showed me a top that had 20 pieces! She made it from scraps of her previous projects. It was really nice. I was very impressed that she had the mind set and patience to piece together a pattern that would look nice. The color scheme was great and she used a lot of top stitching so that the pieces looked like part of the design. I loved it! But, I did not want to put that much thought and effort into the design and all that top stitching!!!  After all, I was just a teenager and patience was not one of my virtues.

Then I went over to the other aunt's house and she was working on a "crazy" quilt. I inquired as to what pattern she was using and why she had so many colors and sizes of fabrics.  She told me when she makes an outfit, the left over scraps go into her quilt scrap bin saving them for a "crazy" quilt. I was fascinated by the twists, turns, colors and designs of the various fabrics and the fact there was very little planning other than which fabric you liked next to which fabric. I WAS HOOKED!!!

My fabric saving obsession started then. It was my aunt's fault for introducing me to saving the smallest scraps. Larger scraps for sewing together into a pieced or "crazy" quilt and smaller scraps for applique. I knew about quilting squares but had never heard of  "crazy" quilting . . .this was before the internet and the abundance of quilting magazines that we have now.

Today I would like to show you a sample of the pieces that I acquire while cutting fabric for customers.
These are some pieces that I have left over . . .


How I trim these down is what I will be showing you today. In the picture above right I had just finished cutting hexagons. You can clearly see some triangles, diamonds and some strips that can be cut from these pieces.  But what about pieces that are not so clearly defined? Here is an example . . .


I found this piece and was thinking to cut a long strip across the top. Then I noticed that if I used my
quarter square ruler I could cut a fairly large triangle.  I use two rulers when cutting difficult triangles. The quarter square triangle and half square triangle ruler.  After I cut this piece into a quarter square triangle I used the half square ruler because presently I am trying to cut a lot of half square triangles.

This picture shows a piece that has a tear in it . . .


Too bad it would have made a very nice large triangle. No matter, just move the half square ruler over a bit and cut away.

Here is a circle that didn't quite meet standards and I don't need a circle but need a triangle in this fabric. . .


Line it up with the edge of the circle and cut both sides to give you an angle. It will look like this . . .

Once you have this angle flip it so that it will look like this . . . 


Now you have an edge where you can line up your half square triangle ruler and finish cutting a triangle.

I hope this little tutorial will help you figure out what to do with your scraps. If you have any questions, please email me through the contact form on this blog. I will be happy to help.


Sunday, June 1, 2014

Which Triangle?

After I cut circles from fabric for customers, I am left with a lot of pieces.


I then cut them into triangles like this to use in my projects.


Sometimes the pieces are fairly large and being the frugal quilter that I am, I want to save as much fabric as I can.

I am undecided as to which way I should cut this piece.
This way for half square or quarter triangle


OR
This way with the trirecs ruller for a pyramid triangle? I just got this ruller and have not used it yet.


I was just wondering which would be the more thrifty way of cutting. I do not like to waste even little bits if it can be helped.


Friday, May 30, 2014

Not snow. . . FLOWERS!


We were headed home from shopping in Las Vegas, New Mexico and I saw this white streak on about 10 acres of land. Sorry for the remoteness of the picture, I took it with my phone.

Since it has been hailing the past couple of weeks and the weather has been so freaky, I thought it was left over hail or snow. Some of our higher hills still have peaks covered in snow.

My husband said no, that's not snow its flowers . . . white daisies!

Oh my! They were so beautiful! Then I began to notice they were everywhere!
Not on every piece of acreage, just here and there.

I had forgotten that every year at this time of year, with all the spring rains, we get these fields of wild flowers. They are never in the same field every year, the locations are very random. You never know where you will see all this beauty.

It seems the colors are never exactly the same. Last year they were golden yellow, the year before they were light lavender, and so on.  I have never seen white or red.

Whatever color they are they are so beautiful and so plentiful, they take my breath away. Being a city girl from California, I had never seen this beauty before.


Monday, May 26, 2014

Cleaning and Testing New Vintage Machine

I have spent my holiday cleaning and researching my gifted vintage "Housekeeper Deluxe" sewing machine. Here is a picture of her after her preliminary cleaning. Isn't she beautiful?  The paint job is excellent! It either was very well taken care of, used very rarely or repainted. I still have more cleaning to do. It seems every time I step away for a few moments and come back I find more "spots" to clean! Since it was probably stored in some warehouse for many years, I know it will take time to discover all the nook and crannies that I need to clean.


Here is a picture of the side of the carrying case after I started stripping the paper.


This is that same side after I finished stripping all the paper. Now I only have three sides and the top cover to go! I also have to figure out how I am going to glue the top together so it will not split again.


But, before doing any cleaning outside and stripping paper, I researched the machine so I could thread the bobbin and the machine and test sew.  The following picture shows some of the testing I did.  It did very well. I still have to adjust the tension more, but that will take time to get it just right.


I had ordered some rubber "tires" for the bobbin winder of my Singer Hand Crank and had a couple left over. I tried one and it fit the first try!  Lucky me! Now I can wind the bobbin. Next step will be to buy more bobbins.

I also noticed that there were some sparks coming from the motor. Some people on the internet say that is very common among these machines and other people say that the machine's brushes should be replaced.  So, that is something that I have to do research on and will let you know what happens.

In the meantime, I still have the big job of stripping and refinishing the carrying case, buying more bobbins and finish cleaning all those nooks and crannies.  But, I love that it works and it's so quiet and smooth. It's just a matter of time and patience to finish the job . . .just like quilting!!

Friday, May 23, 2014

A New Vintage Sewing Machine . . . Housekeeper Deluxe

Today my neighbor let me know that her son didn't want the sewing machine that he had won at the auction. He thought he had been bidding on a treadle machine and it wasn't what he was looking for. So she asked me if I wanted the machine, if not they were trashing it.  I never turn down free sewing machines! Of course I said yes!

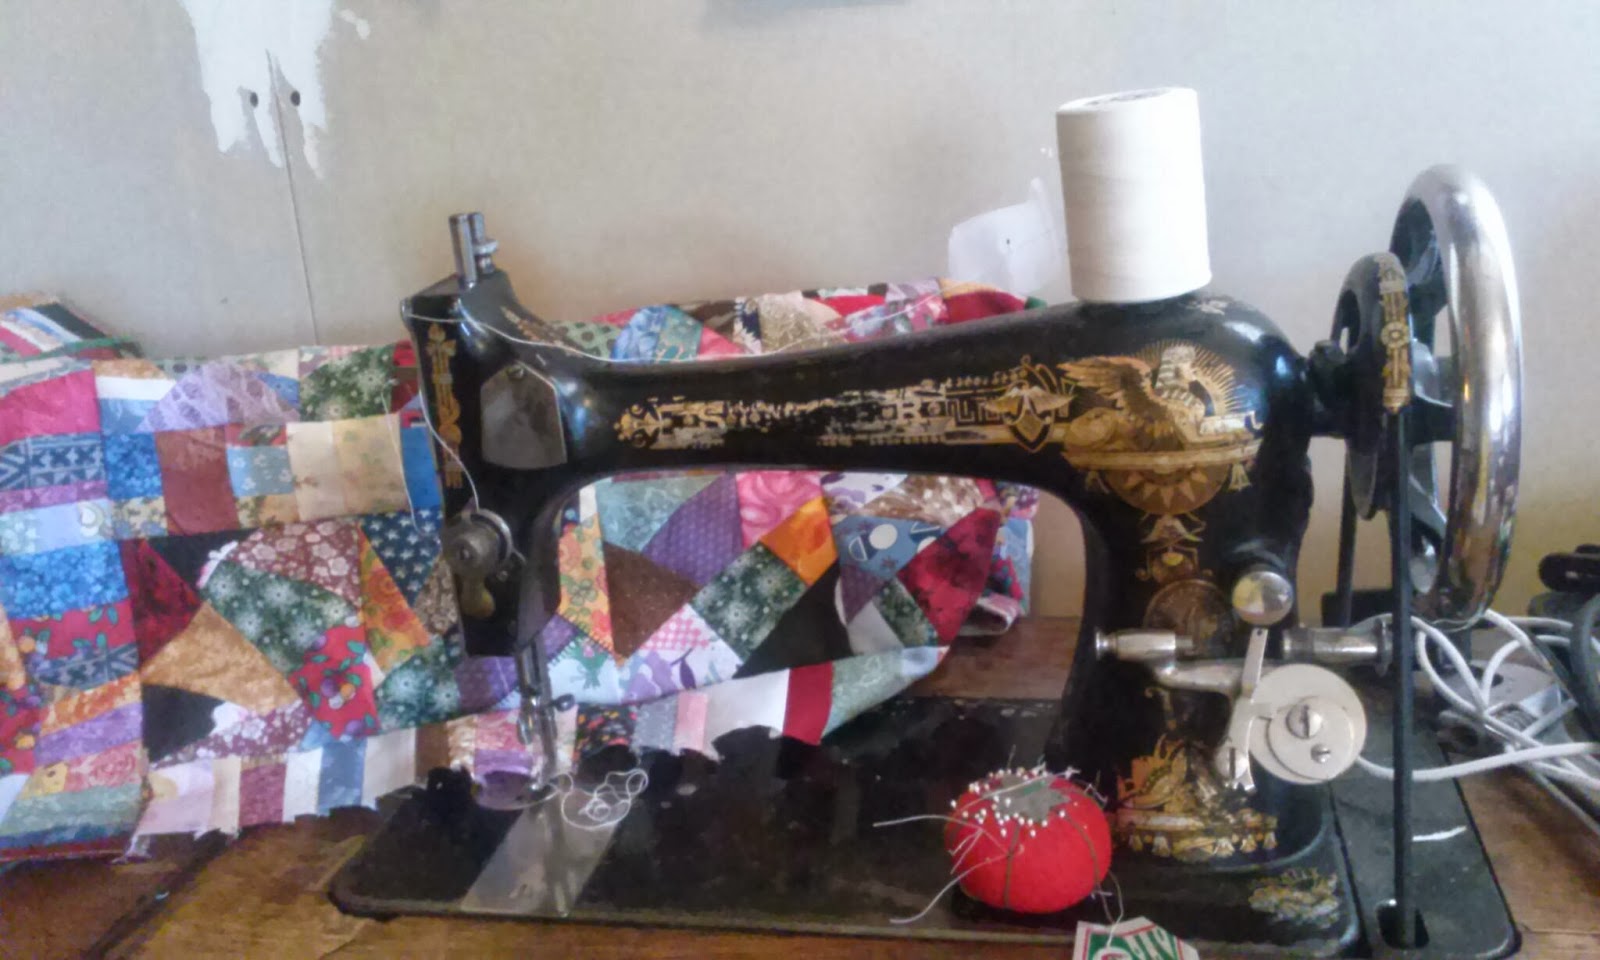
Here is a picture of it in its present condition . . .


Pretty dirty isn't it?

I noticed that the case, even though the top is broken, is made of wood.  That means that all that dirty, torn covering can be taken off and something new and pretty applied to the wood and the top glued back together. I am wondering what design should I put on the cover? Should I use fancy scrapbook paper or should I use really nicely designed fabric like a paisley.  I am looking for suggestions!

My neighbors son said that the machine works.  So that's a plus. He said the needle went up and down when he pressed on the peddle. But he never threaded it because he didn't know how. I needed to find a manual so that I could thread it and test it to see if it really works and has a good stitch.  So I went searching on the internet and found a company named "Sewing Manuals".

I was on their website for about an hour searching for this machine. The name on the machine is "Housekeeper Deluxe" Model 400.  I couldn't find a name for the manufacturer, just that it was made in Japan.


While I was searching the internet for manuals I read a lot of information about "badging" sewing machines. The machines were manufactured in one style over and over again, then sold to big retailer stores.  Several different names of stores or companies would be put on the machine.  Thus you could buy a "Housekeeper Deluxe" and it would be the same as a "White" sewing machine, but with a different name!

This machine is not a straight stitch, it has zig zag and cams for decorative stitching.  So with all this information in mind I went to Sewing Manuals online. As I stated before I spent a good hour trying to find the "Housekeeper Deluxe, Model 400".  No such thing!

 I remembered that they were essentially a "White" sewing machine and looked under "White".  They had dozens of machines!  Luckily, they put a picture of the sewing machine model next to the description.  That is what took so long. Looking at the different model pictures and comparing it to my sewing machine.

I finally found a picture that matched almost exactly.  The only difference was the upper arm thread guides in the picture were spring like curly cue type.  Mine were just straight flat pieces of metal with holes for the thread.  Everything else matched exactly. You can see the "flat upper arm thread guides" in the picture below. One is in back of the words "Push down to darn" and one in front. The dark square hole to the right of those words is where the cams are placed. The cover is laying to the right of the square hole.


I am so glad that I found this manual. Now I have the correct threading diagram, which is extremely important.  The machine came with one bobbin and no cams.  My next step is to find the correct bobbins for this machine. It does not say anything in the manual about size of bobbins. It only has the size of needles.


Here is a picture of the bobbin that came with the machine and the bobbin case. The bobbin case is inserted on the left side under the feed dogs in a sideways position. In the picture below you can see where you would insert the bobbin.


After I get the correct bobbins and clean the machine well, get the stitch correct and re-cover the carrying case, maybe I will look for the cams that go with the machine.

I will be posting more pictures of the progress that I make on getting this machine clean and nice looking.

If you need a manual for a sewing machine, I recommend that you go to this website.  They have hundreds of brands and models.

Monday, May 19, 2014

A Fun Swap!

I have always wanted to do a swap. So the past couple of years I have done fabric swaps.

Then I got brave and wanted to do a quilting swap.  I have just finished my first quilting project swap.

Once I signed up for the "Mug Rug" swap I received the pattern and all the information I needed to do the swap. Later the moderator sent an email with the swap partners email address. I was paired up with a person in the midwest.

For my first quilting swap I wanted something small and the mug rug swap was perfect!

Here are pictures of the two different patterns for the swap that we were to use. The one with the dime in it is for size reference. The mug rugs finished at 9" x 5 1/2".

I love this little pattern and working on this project. It went along very quickly. I am excited to see what my partner is sending me.

Spring Has Finally Arrived!

Three days ago we had snow in Guadalupita and the temperature was in 20's and 30's.


 But yesterday it was in the high 70's and today its supposed to be in the high 70's also.


My husband cut our lawn for the first time today!  YAY!  I have moved my hand crank machine to (what we call) "the new trailer". I will be working in there during the summer.  Of all our living quarters, it has the best views out its many windows.

I am still trying to sort, toss and organize my fabrics, patterns, knick knacks, what nots and other assorted stuff.  Now that our storage shed is almost finished, I decided to start bringing boxes from commercial storage in Las Vegas and sort, toss, etc.  This was our storage shed's foundation laying days.


I can do the sorting, tossing, etc. a little at a time and start converting from moving boxes to plastic storage bins and labeling and placing them in our storage shed.

The storage shed has walls and a roof, just has not been wired or the outside finished yet, but it's useable while they finish the outside.


Saturday, May 17, 2014

Bobbins, Bobbins, Bobbins!

One of the things I love most about my little hand cranked singer sewing machine is that I can always use it. . . Power or no power! It is so sweet and easy to crank. I love it! I love it!

When I received her, I noticed that she only had one bobbin. Anyone that sews knows that you need at least two bobbins. So I set about hunting down another, or more bobbins.

I went straight to the internet. Living in the mountains of New Mexico is wonderful but not when you are shopping. The internet is my" local" shopping mall.

I found a website that deals with supplies for vintage machines and ordered bobbins for a vibrating shuttle machine. They came in packs of 5. I ordered two packs. 10 bobbins!! I was so excited when I received my little package!

I started winding the bobbins immediately. I then noticed that the thread was winding itself beyond the area where the thread is supposed to be. At first I thought I had done it wrong. I wound another new bobbin. This time I made sure to follow the instruction manual step by step when winding the bobbin. It happened again! There was the thread beyond the flange at the edge of the bobbin!  You can just barely see in the picture below (slightly blurry) that the little arm has extended beyond the edge of the left side of the bobbin.


In the picture below you can see the thread that wound beyond the flange of the bobbinl.


Now what? I wound another bobbin. This time I went very slowly so I could watch the action.  I noticed that the thread continued it's journey to the left of the bobbin's left flange only after the bobbin winder went to the left. It did not go past the flange on the right side. I tried to figure out why it did this.  I finally came up with the idea that the new bobbins might be a little too short. I have laid out the new bobbins side by side with the bobbin that came with the machine. You can see in the pic below, the new bobbin IS shorter, slightly from the original which is in the middle.


Back to the internet! I ordered from a seller on eBay. They were supposed to be original bobbins, not reproductions. They were too long! In the picture above, the top bobbin is too long and the bottom bobbin is too short. The middle bobbin is the one that came with the machine and is "just right"!

Back to the internet! I thought to myself. . . Third time's the charm. I found another vendor that was selling 12 assorted sized bobbins there were not reproductions. When they came I noticed that some were even fatter than my original, some were smaller. But, I noticed that there were two that were" just right"!
I now have three good bobbins!! YAY!

Lesson learned. . . Measure your bobbins carefully before you buy and ask the vendor to tell you how long the" axle" is. The axle is where the thread will wind. Measure the diameter of the right and left flanges. As you can see in the picture below, the flange on the right most bobbin is too wide. It won't fit in the bobbin winder.


Apparantly not all" vibrating shuttle" bobbins are made equal. Something I took for granted and wished I hadn't because I ended up spending almost $50 with the shipping charges and ended up with only 3 useable bobbins. The bobbins that are "too short" are still useable in the shuttle but are a pain to wind because of the overlapping to the left. The bobbin that is too long will not fit in the shuttle and as such can not be used at all.
This is the correct bobbin and is winding correctly!


Monday, April 21, 2014

Beautiful Spring Day!

Unbelievably beautiful spring day today, finally!
We had some rain last night and this a.m.   Really nice to not have snow in the yard.
The neighbor brought his cows into his yard this morning. His yard borders ours so our blue heeler was running back and forth and barking to keep them moving as they walked past our gate.
I am still working on the cover for the new hand crank machine. I made a mistake on one of the seams and had to rip it out. But, I should have it finished today.
Here are the cows. . . Can you see the two babies born this spring?

Thursday, April 17, 2014

In Love With My Hand Crank

Today it was very cold! I had the wood stove burning all day.

Of course I hibernated today because of the snow and cold. And what is the best way to do that??

With quilting of course!!! So, I decided to sew a cover for my new hand crank sewing machine! It came with the wooden coffin cover but I would have to take the handle off to use that cover. I want the machine set up so I can jump in and sew whenever I feel the urge.

It's the perfect project to test a machine. I am using string paper piecing with scraps. It is not precise so I can practice feeding the fabric with my left hand while cranking with my right hand. They are small pieces so if I make a horrible mistake, I don't have a large piece to rip out and its using up my scraps!

Here is my progress on the cover so far. . .

WINTER STILL KICKING!!

This is what greeted us this a.m. Just before the sun came up.

You can just see a slight rosy glow behind the mountain behind the house.

It's beautiful I know, but I want to see beautiful Apple trees in bloom type of beauty.

Wednesday, April 16, 2014

Another Beautiful Antique Sewing Machine

I am so much in love with my antique Singer treadle sewing Machine.  But, when I saw the hand crank Singer sewing machine on some website that I was visiting I knew I had to have one!

I found several of them for sale on different antique sewing machine websites, craigslist and ebay.  Most of them were way out of my budget.  I kept scouring and scouring the ads until I found this little number.

I bought it right away!  It arrived today! Here are some pictures of it. It was made in 1892 according to its serial number.


It is in great condition and it has an owners manual!


The decals look great

The coffin case is almost falling apart on one side but I think it's fixable.

I tried sewing with it and it sews great. It needs to be cleaned as it seems it has a lot of dirt, no gunk though!
I am making this short, because I want to play with it. I really like that it is smaller than most machines from this era.

Wednesday, April 9, 2014

Beautiful Day!

Yesterday and today have been such wonderfully beautiful Spring days!

Yesterday I spent the day cutting fabric as I had an order for 3 inch hearts. I took a break around noon for lunch and to sit outside for a little sun.

It was so nice and warm! Of course I didn't stay outside in the sun too long because the sun here in New Mexico can be brutal!  But, just 5, or was it 10 minutes really helped perk me up.

I was really starting to get cabin fever with the snow and cold but yesterday and today I have re-energized my soul!

Since I finished that hearts fabric order, today I spent the day cutting strips and sewing little blocks for a baby quilt. I am making two baby quilts, one pink and one blue.  This year I am going to be ahead of the babies, which I know, will eventually come.  I will be prepared!  Once I have finished the two quilts, I will put them away and wait until someone has a baby! One will be predominately pink but not all pink and the other predominately blue.

The last time I made a baby quilt, I was rushing to have it finished by the date of the shower. I hate that kind of stress so I promised myself I would be prepared for next time.  And there will be a next time!

So here is a picture of the blocks. I don't know what the pattern is or if there even is a pattern. I just sewed 1 1/2 inch strips around a 4 1/2 inch block. I sewed kind of in the log cabin fashion but only one row. Next I will sew all the blocks together and then add a border and then hand quilt.  I was also thinking to add a solid color sashing instead of sewing block to block.  I'll have to see what that looks like and then decide.

Sunday, April 6, 2014

UFO's Are They Taking Over?

Anyone who has been a quilter or crafter for a long period of time knows how UFO's get started, how they multiply and the guilt they infuse in the owner!

UFO's? What are they? Where do they come from? How do they multiply? and What do we do with them?

A statement was made recently that a quilter had so many projects going that she was overwhelmed and gave up and stopped quilting. How should she handle this situation, she asked.

I have typed up a suggestion of how to proceed with the UFO's, which she clearly had a stack of.  I am adding that 12 steps program to the new "Tips & Techniques" page. Click on the tab at the top of the home page.

Please take a look, maybe it might help with your UFO problem!

Friday, April 4, 2014

More Snow Again?

It seems that winter is not done with us yet!


I thought it was because after the last snow in March everything was starting to turn green. I was so happy to see the grass in my yard turning green.  Not in just spots, but all over!

Well, yesterday . . . SURPRISE!  More snow!


Here is my yard coming alive. YAY!


Same yard yesterday! Booo!

I made this extra large because I think it is neat the way you can see the snowflakes!
They look like little tiny dots against the brown of the neighbors house.

I am ready to be outside. I love being inside and working on my quilting but my body is craving sunshine!

Sunday, March 23, 2014

More Snow?

Since Spring has sprung, my apple trees have started budding.  I was so excited!

But, last night we got an inch of snow! Hopefully all the blossoms hadn't come out yet and the trees will still blossom and give us apples.

Last year we had a late freeze and all the trees in the surrounding area lost all their blossoms.  No one in our area had apples or pears.

I am hoping that won't happen again this year.  We have yet to see.  It is very nice today. In the fifties, no wind.

Let see what happens next week.

Thursday, March 13, 2014

Working Hexies Just For Fun

Here is a picture of my latest folly! Half Inch Hexies!!

I layed out the project on top, but you can barely see it here.

Please notice that the hexies are as big as the thimble, bobbins or my fingertip. I thought it would be fun to make a small project . . .just for fun so I can say I did it!  So I decided to make a dresser scarf.  That pink, grey and red strip on the top of the picture is the project.

They actually don't take long to form around the foundation papers. What takes a long time is making enough of them to cover anything! Since I am using freezer paper for the hexies, I don't have to deal with pins or glue, just iron then on to the fabric.

I will keep you posted on this project.

Next time I use this size, I will make coasters . . . LOL!

Can't even imagine doing a king size quilt!!!


Tuesday, March 11, 2014

Fantastic Vintage Machine!

I just finished sewing my "Bonnie Hunter" style "crumb" strips with my crazy quilt squares to make the sewing machine cover shown below for my Vintage Singer Treadle Sewing Machine.

I did all the sewing on this treadle machine.  It is still a little sluggish. But with a little more TLC and elbow grease it will soon be flying! I have been cleaning and adjusting for several months.  The stitching is great but the treadling movement is hard and its supposed to be easy. So I figure I still have more work to do on the cleaning and adjusting.


I didn't use a pattern for the cover. Just measured from one end to the other of the machine and from the top to the bottom.  Then I cut rectangles and sewed them together with the crumb strips.  My sewing is a little crooked because I am just starting to learn how to treadle. 
 
Now that I finished the format of the cover I will embellish it with lots of beads and embroidery.  Since the machine is of a vintage age, I think the cover should be embellished in vintage style also.


Tuesday, February 18, 2014

Quilter's Beware!

This was recently posted on Facebook and I thought I should share it with you!