I see that I have delayed posting for quite a bit!
I have had several orders to cut and ship and of course, life gets in the way! I apologize for not posting sooner.
Today I am finishing the last order that I have at the moment. Since we have no mail today, it will ship tomorrow. So today after the order is finished, I will be working on my hexies, who have been sorely neglected lately. And, of course, I will be working on my daughters quilt.
It seems that I will not be able to reach my goal for her birthday, so many things going on lately! But, probably a month after. . . I hope. Either way, I am sure she will be excited to get it no matter what time I give it to her.
So I am signing off now so I can get back to finishing that order and get to the hand quilting.
Showing posts with label hand quilting. Show all posts
Showing posts with label hand quilting. Show all posts
Monday, February 17, 2014

Thursday, January 30, 2014
No Power!
Got up this morning to start the wood burning stove at 4:30 a.m. Just as I slipped back into bed the power went off.
It has been going off and on since then and it is now five thirty. As you can see in the picture below there are no lights, just the stove. It is still dark outside.
I have a treadle machine so sewing will not be a problem, but I wanted to hand quilt on my basket weave quilt. My senior eyes can't see as well with battery powered lanterns when it is dark. Well at least for doing close up fine work like hand quilting.
I guess I will have to wait until daylight. Thank goodness for cell phones.

Wednesday, January 29, 2014
Quilting the Basket Weave Quilt
Today it will be slightly warmer than yesterday. Yesterday it only got to the low thirties. Today it will be in the forties. Nice day to spend doing nothing but hand quilting,
Yesterday I almost got the one section, you know the part between the poles, done. Just about five inches not done. I intend to finish that part and then get half of another section done today.
Can't quilt tomorrow, going to Vegas to pick up stuff. So either I will not have time or I will be too tired from shopping all day! LOL!
Have to keep working feverishly, my deadline is fast approaching! Can you believe we are at the end of January already??? On my!!!!
Wednesday, January 22, 2014
Yes, We Have No Quilting Today!
It's been a couple of very busy days here. I have had to actually do my job and cut several orders. So I have not even touched a needle or machine for almost five days.
I am in quilting hell! LOL! No quilting, no sewing, no applique! Oh my!
Tomorrow is my last day of cutting, I have finally caught up.
We are awaiting a snow storm and a cold front in our area. It won't be as bad as in the east but it's the kind of weather when a home made pot of soup is great! My husband was kind enough to oblige in the soup department while I cut the orders and brought in enough logs for the stove to last for two days. So we are prepared to sit out the storm.
So hand quilting here I come! YAY!!
Friday, January 17, 2014
Making Progress. . . Again!!
This is my progress so far since I rerolled the quilt sandwich.
Where
the masking tape strip is located is the current row that I am working
on. Lower, toward the bottom of the picture is two more rows that are
faintly visible.
I
am surprised that I am this far in just a couple of days. Several
other things interrupt the progress of the quilting but I try to devote
at least an hour a day to this project because my deadline is in March.
Maybe
it's my imagination but now that I rerolled the quilt sandwich, it
seems to be easier to quilt it and it seems to be going quicker than
before when it was crooked.
Strange
what the power of suggestion does to the mind! LOL! Even though it was
a difficult decision, I am glad that I decided to take it apart and
start again and it hasn't taken long to catch up to the point I was at
before.

Thursday, January 9, 2014
Beginning again
I realized after quilting two rows across the width and two cross wise small sections that my quilt was askew. No amount of tugging and fudging was going to straighten it.
So, I made the dreaded decision to rip out and start over again!!! Oh my!!
I took all my supplies and my quilt into our nearest town of Mora, to the conference room at "Tapetes de Lana", a local rug weaving enterprise. They have several rectangular tables for use and as long as they are not booked they do not charge to use for private purposes such as mine.
I gathered the tables together in the center of the room in the shape of a large rectangle.
Then I started laying out my quilt, First the backing, which I taped to the tables. Then I layed the batting on top of that. After I got the batting nice and smooth, I layed the quilt top.
After I got the whole thing nice and straight, I pinned the leader cloth to the edges, inserted the bars and with my husband's help rolled the whole thing onto the bars. This whole process took about three hours because I was doing most of it by myself while my husband did some errands in town.
When we finished rolling we went home and mounted the bars onto the frame.
NOW I am ready to hand quilt it. It is nice and straight and I have learned never to rush when you are mounting a quilt sandwich onto the bars.


Saturday, January 4, 2014
Progress Being Made
I have not hand quilted in months. Since we can not be outside because of the cold,wind and snow, I am glad I have the basket weave quilt on the frame to work on. I realised too late that this quilt is going to be difficult to hand quilt because of all the small seams. Yesterday I only got one and half rows done and today the same.
Besides there being plenty of seams to quilt through, my fingers are painful today from the cold affecting my blossoming arthritis. I say blossoming because it is getting steadily worse each year. But, they say exercise is good for arthritis so I keep hand quilting!
Very little progress today,but progress nevertheless.

Friday, January 3, 2014
Finally starting to Quilt!
I finally got my quilt onto the frame. My husband bought some new wood bars from our local lumber yard.
Once we got the quilt rolled onto the bars, I piled up some plastic boxes and one case of soda (LOL it's the only thing that would fit!) in the middle for support. I didn't want to take any chances of these bars breaking. I had already wasted $30 on buying "new extension kit bars" that broke.
Even though these were a solid piece of wood eight feet long, they were 1 1/2" by 1" thick.
I was holding my breath while we were attaching the rolled quilt to the frame. Thank goodness it held and didn't crack! I am a happy quilter again!


Saturday, August 3, 2013
Finally Pink Baby Quilt is Done!
I haven't been posting the past few days because I have been diligently frantically working on getting this pink baby quilt finished!
Well, Here it is! I just finished the binding and took some pictures to post. I didn't put any quilting on the border. But now that I look at these pictures, I see that the border is still crooked!!! I guess that I will have to add some kind of quilting in the border to "hide" the crooked wrinkles that I see in the left lower corner and the upper right corner. I have no idea how that happened! Maybe because I was in a rush to finish before my daughter comes next week.

This is a close up of the hand quilting that I did. It doesn't look too bad! Does it?

There is not much else I can do to improve it, now that it is finished. I will add a little quilting in the border during this week. It shouldn't take too long. Plus, I have to wash it and wrap it in a box.
Now since that is finished, I can get back to my string quilt! Oh, wait, I have to wait until my daughter leaves from her stay here with us!
I can't possibly be sewing on the sewing machine because it is in the cabin where they will be staying. I can't move it because all my sewing supplies are in there too! Oh well, I guess it's time to get back to my hexagon "insanity" quilt while she is here!
I love my hexagon project! It is still a long ways away from being put together, but I love the hand work. I am still forming the individual hexies and then forming the individual flowers for the center.
I will post pictures of my progress later this week.
Meanwhile . . .
Keep on Quilting!
Aveli
Saturday, July 27, 2013
Quilting Away on a Baby Quilt Gift


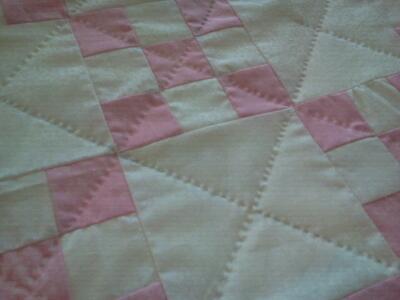
Here you can see a close up of the hand quilting that I am doing. I am almost done with it. I will post a picture of it when it is finished.
I have to work on this to get it done before my daughter comes on the 9th so I can fold it up and put it away. Don't want my little granddaughter getting into it. But, I also still have to make that little mattress and pillow for the Baby Doll Cradle for my granddaughter. Hope it all gets done in time.
Meanwhile any other projects or UFO's that I have, including the string basket weave quilt, is on the sideline until after my daughter leaves.
I just heard from my youngest son and he said he will be here when the oldest daughter comes from California! YAY! Now, if we could only get the youngest daughter to bring her little family also, then we could almost have a complete family reunion. What fun!
My youngest son wants to rework the roof on the new storage shed we are building. We had a severe hailstorm and it ripped up the roofing paper that had just been laid the week before. That has to be replaced before we can put the propanel aluminum shingles. Maybe my son-in-law will help a little while they are here. My husband is not physically able to help anymore since his stroke.
Meanwhile, Keep on Quilting!
Aveli
Tuesday, July 23, 2013
Baby Doll Quilt Finished!
So Yesterday I finished the baby doll quilt! YAY!
I sewed the backing, which is purple and pink hearts, to the quilt top on the machine. You can see the backing in the picture below. I decided on sewing on the machine because I didn't think I had enough time to hand quilt. After I finished sewing the two layers together I needed to bind it and decided to use the border for binding.
First I trimmed the backing close to the quilt top edge as seen below in the picture.

Next, I rolled the border back onto the backing and tucked it under itself and pinned. See picture below.

Here you can see the rolled border from the front -- before and after rolling and pinning.

I hand stitched the binding in the back and that was it! I loved making this little quilt from all my scrap crumbs.(tiny pieces) It really did save a lot of fabric and makes a very nice little quilt for a baby doll for granddaughter! Now that I saw how cute this came out, I think I will use my other scrap strips to make a table topper for the cabin. Although, I wont use white for the sashing, maybe a wine.
Now to get back to the baby quilt that I am hand quilting for my neighbor's granddaughter who is expecting in September. I will post pictures of that quilt some time later this week when I am finished.
Keep on Quilting!
Aveli
Tuesday, July 16, 2013
They're Coming! They're Coming!
I feel like Paul Revere with that title. LOL! But, I am excited about my daughter's family visit. She called last night to say they would be here in 2 weeks!
Just barely have enough time to finish my granddaughter's baby doll quilt. I will have to stop working on my string quilt and my cross stitch project and finish that little quilt.
Maybe I should just machine stitch it together with the backing?? What do you think?
If I go ahead with the tying, I can tie it every 2 or 3 inches. The quilt top measures approximately 24"x 26". If I tie every 2 inches, that means I will have 12 across by 13 down which equals 156 ties. Am I capable of finishing that many ties in 2 weeks? and then do the binding?
The binding is another question. I always do bindings by hand! Should I hand bind or machine bind? Help me out folks what would you do? It's really not a big quilt, but I also have to organize, stash, clean, dust, vacuum and child proof the cabin for their visit. My granddaughter is only 2 years old, so I have to go over the cabin with a fine tooth comb to child proof.
Any suggestions would be appreciated. I will start finishing it tomorrow. Today my "dance card" is already full of preparations for the visit.
I will post the final decision as to the finishing of the baby quilt. Let me know what you think!
Keep on quilting!
Aveli
Just barely have enough time to finish my granddaughter's baby doll quilt. I will have to stop working on my string quilt and my cross stitch project and finish that little quilt.
Maybe I should just machine stitch it together with the backing?? What do you think?
If I go ahead with the tying, I can tie it every 2 or 3 inches. The quilt top measures approximately 24"x 26". If I tie every 2 inches, that means I will have 12 across by 13 down which equals 156 ties. Am I capable of finishing that many ties in 2 weeks? and then do the binding?
The binding is another question. I always do bindings by hand! Should I hand bind or machine bind? Help me out folks what would you do? It's really not a big quilt, but I also have to organize, stash, clean, dust, vacuum and child proof the cabin for their visit. My granddaughter is only 2 years old, so I have to go over the cabin with a fine tooth comb to child proof.
Any suggestions would be appreciated. I will start finishing it tomorrow. Today my "dance card" is already full of preparations for the visit.
I will post the final decision as to the finishing of the baby quilt. Let me know what you think!
Keep on quilting!
Aveli
Tuesday, July 9, 2013
Hexagons
I have always wanted to do a quilt project by "hand". I know, I
know, CRAZY! Why would I want to do a project by hand when I have 2
perfectly good sewing machines!
Well, to start off, there are a lot of hand sewers out there. I've always wanted to see what kind of woman or "gumption" I would have to have to do this type of thing. Trust me, you really have to LOVE hand work to do this.
I have always felt drawn to hand work. Since I was little, my mother taught me to embroider and crochet. Later I would pick up counted cross stitch, knitting and quilting. By the way, the cousin who taught me to knit was left handed, so I knit left handed. It throws a lot of knitters off when they see me. As one lady commented a long time ago when I was younger -- "What ARE you doing??"
I love to hand quilt my quilts. But, in my quilting history I had not made an entire quilt by hand instead of the sewing machine. I do a lot of applique, but I usually do piecing. I also wanted a project to do on the road while we travel back and forth from this great state to another. Applique was out of the question for me because of the finesse needed and my failing "old" eyes. So, I decided on hexagons!
At first, I decided to start with just a long skinny scarf for my dresser. But, when I saw how nice it was starting to look, I upped the size to a crib size and then to a double bed size.
Once I decided to do this project, I was overwhelmed by the many choices of methods to do this labor intensive project!
One of the first things I had to decide which template do I use for cutting the hexagons.
I know that I sell pre-cut or die cut hexagon fabrics either alone http://avelisquilts-ivil.tripod.com/id9.html or in kits http://avelisquilts-ivil.tripod.com/pieced_quilt_kits.html (scroll down for hexagons). I also sell precut Hexagons in freezer paper either precut or printed on freezer sheets http://avelisquilts-ivil.tripod.com/id165.html.
The problem was that I was like Goldilocks. . . the 2" was too small and the 4" was too big. I needed something "just right". What I wanted was about 1/4 inch bigger all around the 2" size so that when I sewed them, they would end up being 2". So, either of the sizes I sell were not "just right"!
Also, remember I couldn't use the freezer paper method, as a template for cutting, because I was going to be in the car and an iron was unavailable. So I went ahead and manually drew the 2" size by tracing around one of my freezer paper die cut pieces on a regular piece of paper. I then used the freezer paper piece to draw a copy on a piece of milk jug plastic with a permanent marker. I heartily recommend using this plastic for templates. It saves throwing the plastic into the landfill, its economical and it endures. Yes, you still have some plastic left over that can't be used. But, it's a lot less than what you started with. Just make sure you have a heavy pair of scissors when cutting it because of the thickness.
Another thing I like about milk jug plastic is that the inside of the milk jug is rough textured, not smooth like the outside. The rough side when placed against the fabric helps to grip the fabric.
I now had a 2" drawing on regular paper and a 2" drawing on a large pieces of milk jug plastic.
Next, I used my ruler and drew an additional 1/4" line all the way around the paper 2" drawing. I now had the size that I desired. I cut this out on the last line that I drew, not the inside line. I used this piece of paper as a template to draw another hexagon on the milk jug plastic. I now had two hexagons drawn on the milk jug plastic. one was 2" and one was 2 1/2 inches. I cut both of them out, punched a hole in the middle of both. I was ready to start drawing on fabric!!!
WAIT! No I wasn't! What was I going to use to mark on the fabric?? With all the choices of marking tools now days. . . . Well that's another day's blog entry!
Stay tuned for further adventures in sewing Hexagons and follow my progress! Meanwhile, back to quilting!!!
Well, to start off, there are a lot of hand sewers out there. I've always wanted to see what kind of woman or "gumption" I would have to have to do this type of thing. Trust me, you really have to LOVE hand work to do this.
I have always felt drawn to hand work. Since I was little, my mother taught me to embroider and crochet. Later I would pick up counted cross stitch, knitting and quilting. By the way, the cousin who taught me to knit was left handed, so I knit left handed. It throws a lot of knitters off when they see me. As one lady commented a long time ago when I was younger -- "What ARE you doing??"
I love to hand quilt my quilts. But, in my quilting history I had not made an entire quilt by hand instead of the sewing machine. I do a lot of applique, but I usually do piecing. I also wanted a project to do on the road while we travel back and forth from this great state to another. Applique was out of the question for me because of the finesse needed and my failing "old" eyes. So, I decided on hexagons!
At first, I decided to start with just a long skinny scarf for my dresser. But, when I saw how nice it was starting to look, I upped the size to a crib size and then to a double bed size.
Once I decided to do this project, I was overwhelmed by the many choices of methods to do this labor intensive project!
One of the first things I had to decide which template do I use for cutting the hexagons.
I know that I sell pre-cut or die cut hexagon fabrics either alone http://avelisquilts-ivil.tripod.com/id9.html or in kits http://avelisquilts-ivil.tripod.com/pieced_quilt_kits.html (scroll down for hexagons). I also sell precut Hexagons in freezer paper either precut or printed on freezer sheets http://avelisquilts-ivil.tripod.com/id165.html.
The problem was that I was like Goldilocks. . . the 2" was too small and the 4" was too big. I needed something "just right". What I wanted was about 1/4 inch bigger all around the 2" size so that when I sewed them, they would end up being 2". So, either of the sizes I sell were not "just right"!
Also, remember I couldn't use the freezer paper method, as a template for cutting, because I was going to be in the car and an iron was unavailable. So I went ahead and manually drew the 2" size by tracing around one of my freezer paper die cut pieces on a regular piece of paper. I then used the freezer paper piece to draw a copy on a piece of milk jug plastic with a permanent marker. I heartily recommend using this plastic for templates. It saves throwing the plastic into the landfill, its economical and it endures. Yes, you still have some plastic left over that can't be used. But, it's a lot less than what you started with. Just make sure you have a heavy pair of scissors when cutting it because of the thickness.
Another thing I like about milk jug plastic is that the inside of the milk jug is rough textured, not smooth like the outside. The rough side when placed against the fabric helps to grip the fabric.
I now had a 2" drawing on regular paper and a 2" drawing on a large pieces of milk jug plastic.
Next, I used my ruler and drew an additional 1/4" line all the way around the paper 2" drawing. I now had the size that I desired. I cut this out on the last line that I drew, not the inside line. I used this piece of paper as a template to draw another hexagon on the milk jug plastic. I now had two hexagons drawn on the milk jug plastic. one was 2" and one was 2 1/2 inches. I cut both of them out, punched a hole in the middle of both. I was ready to start drawing on fabric!!!
WAIT! No I wasn't! What was I going to use to mark on the fabric?? With all the choices of marking tools now days. . . . Well that's another day's blog entry!
Stay tuned for further adventures in sewing Hexagons and follow my progress! Meanwhile, back to quilting!!!
Subscribe to:
Posts (Atom)