This past week our youngest son has been visiting us while he was on vacation from work. What a treat!
It is always great to have him come to visit us. Even though he only lives 3 hours away, it is difficult to get our schedules on the same track.
So the first thing he says when he gets here is that he is going to barbecue. Even though it wasn't until yesterday that he got an opportunity to do so, it was nice to hear. He always makes a great meal!
This time he barbecued 2 whole chickens. They were scrumptious! And today we get to enjoy more of the leftover chicken. Makes for great sandwiches. . .especially when combined with the indian pueblo bread made by the Santo Domingo indians. Yum Yum!
Sadly, he had to leave today. He goes back to work tonight. :(
While he was here, I was working on my string quilt. Making the blocks that is. I started thinking about making a little doll sized quilt for my granddaughter. They are scheduled to visit some time in August, so I bought my granddaughter a small baby doll. That way she could have a "baby" to play with while she was here. Now I am thinking she would have more fun if she could wrap the doll in a blanket. And of course, a simple receiving blanket type would not do. . .it has to be a quilt!!!
So I started sewing the feeder blocks that I make while working on a project. You know, a little piece of paper with leftover pieces of fabric on it. I am using strips of 8 1/2" x 2 or 2 1/2". I mainly want to conserve the amount of trash I throw out so I recycle my printer paper and print on both sides of the paper. Especially when I am trying out new layouts for my quilts. After printing on both sides, I cut some into fourths for note paper, i.e., grocery lists, notes to self or husband and so forth. Some of the printer paper goes into providing foundation paper for the feeder blocks. I cut the printer paper in half to make two 8 1/2 x 5 1/2 pieces and then take those pieces and cut them in half again and end up with the 8 1/2 x 2 1/2 strips.
I layed out the feeder strips into a size that would enable my granddaughter to wrap the doll. I didn't like the layout. So now, I have added white strips between each feeder strip. It made the blanket larger and looks nicer I think.
I will finish sewing it up and take pictures tomorrow and post them here.
Saturday, July 13, 2013
Tuesday, July 9, 2013
Hexagons
I have always wanted to do a quilt project by "hand". I know, I
know, CRAZY! Why would I want to do a project by hand when I have 2
perfectly good sewing machines!
Well, to start off, there are a lot of hand sewers out there. I've always wanted to see what kind of woman or "gumption" I would have to have to do this type of thing. Trust me, you really have to LOVE hand work to do this.
I have always felt drawn to hand work. Since I was little, my mother taught me to embroider and crochet. Later I would pick up counted cross stitch, knitting and quilting. By the way, the cousin who taught me to knit was left handed, so I knit left handed. It throws a lot of knitters off when they see me. As one lady commented a long time ago when I was younger -- "What ARE you doing??"
I love to hand quilt my quilts. But, in my quilting history I had not made an entire quilt by hand instead of the sewing machine. I do a lot of applique, but I usually do piecing. I also wanted a project to do on the road while we travel back and forth from this great state to another. Applique was out of the question for me because of the finesse needed and my failing "old" eyes. So, I decided on hexagons!
At first, I decided to start with just a long skinny scarf for my dresser. But, when I saw how nice it was starting to look, I upped the size to a crib size and then to a double bed size.
Once I decided to do this project, I was overwhelmed by the many choices of methods to do this labor intensive project!
One of the first things I had to decide which template do I use for cutting the hexagons.
I know that I sell pre-cut or die cut hexagon fabrics either alone http://avelisquilts-ivil.tripod.com/id9.html or in kits http://avelisquilts-ivil.tripod.com/pieced_quilt_kits.html (scroll down for hexagons). I also sell precut Hexagons in freezer paper either precut or printed on freezer sheets http://avelisquilts-ivil.tripod.com/id165.html.
The problem was that I was like Goldilocks. . . the 2" was too small and the 4" was too big. I needed something "just right". What I wanted was about 1/4 inch bigger all around the 2" size so that when I sewed them, they would end up being 2". So, either of the sizes I sell were not "just right"!
Also, remember I couldn't use the freezer paper method, as a template for cutting, because I was going to be in the car and an iron was unavailable. So I went ahead and manually drew the 2" size by tracing around one of my freezer paper die cut pieces on a regular piece of paper. I then used the freezer paper piece to draw a copy on a piece of milk jug plastic with a permanent marker. I heartily recommend using this plastic for templates. It saves throwing the plastic into the landfill, its economical and it endures. Yes, you still have some plastic left over that can't be used. But, it's a lot less than what you started with. Just make sure you have a heavy pair of scissors when cutting it because of the thickness.
Another thing I like about milk jug plastic is that the inside of the milk jug is rough textured, not smooth like the outside. The rough side when placed against the fabric helps to grip the fabric.
I now had a 2" drawing on regular paper and a 2" drawing on a large pieces of milk jug plastic.
Next, I used my ruler and drew an additional 1/4" line all the way around the paper 2" drawing. I now had the size that I desired. I cut this out on the last line that I drew, not the inside line. I used this piece of paper as a template to draw another hexagon on the milk jug plastic. I now had two hexagons drawn on the milk jug plastic. one was 2" and one was 2 1/2 inches. I cut both of them out, punched a hole in the middle of both. I was ready to start drawing on fabric!!!
WAIT! No I wasn't! What was I going to use to mark on the fabric?? With all the choices of marking tools now days. . . . Well that's another day's blog entry!
Stay tuned for further adventures in sewing Hexagons and follow my progress! Meanwhile, back to quilting!!!
Monday, July 8, 2013
Hexagon Box - Repost
I posted this on my old blog in January for New Year's Greeting, but I thought it was worth reposting on this new blog.
Happy New Year to all! Hope all of you will have a great year and quilt all year long!
I had previously made a box for my one inch hexies because I was unable to find or wish to spend money on several boxes to hold them while I was making individual hexies.
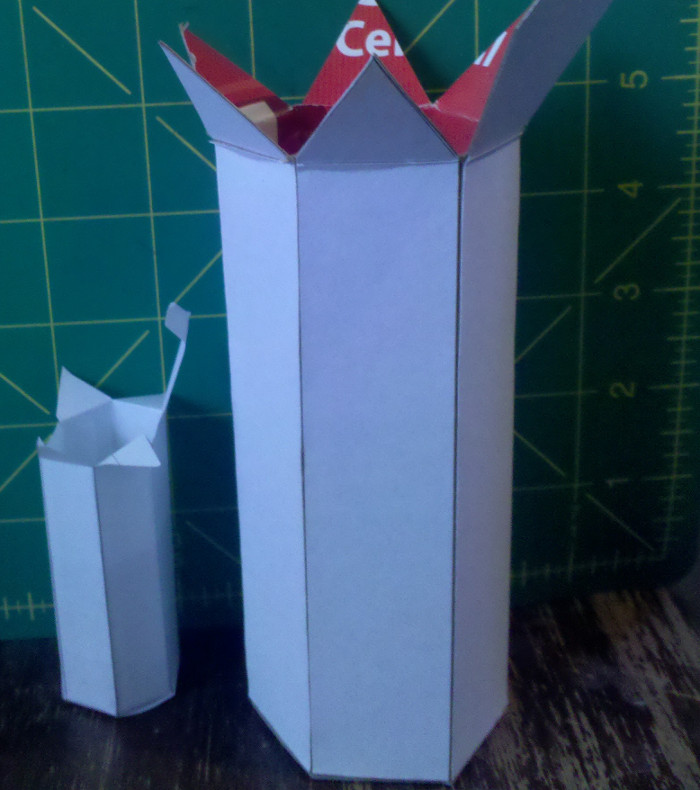
Now I have adjusted the pattern and have made a mock up of a box for half inch hexies. Here is a picture of the mock up next to the one inch box.
You can request either the half inch or the one inch pattern by contacting me through the "contact" link on the right.
Happy New Year to all! Hope all of you will have a great year and quilt all year long!
I had previously made a box for my one inch hexies because I was unable to find or wish to spend money on several boxes to hold them while I was making individual hexies.
Now I have adjusted the pattern and have made a mock up of a box for half inch hexies. Here is a picture of the mock up next to the one inch box.
Notice that the one inch box measures approximately 5 inches
while the half inch box measures only two inches.
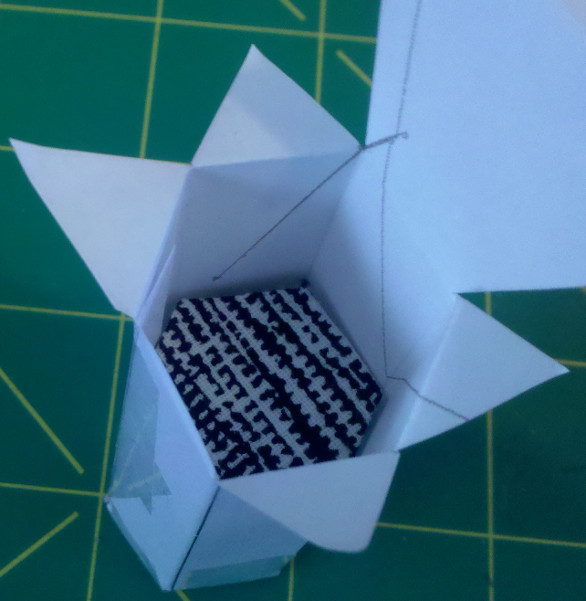
Here is the inside of the box. You can see how snugly the hexies
fit inside. There is no chance for them to shift sideways to get wrinkled.
You can request either the half inch or the one inch pattern by contacting me through the "contact" link on the right.
Of course you can always use the plastic craft boxes available at
the local craft store. But this is so much cheaper! All you need is the pattern
and a cereal box to glue it to and cut and glue and you have a box!
Hope you enjoy this little pattern and the bigger one too!
Subscribe to:
Posts (Atom)